Tissue Paper Pom Pom Ideas (Easy DIY Party Decorations)
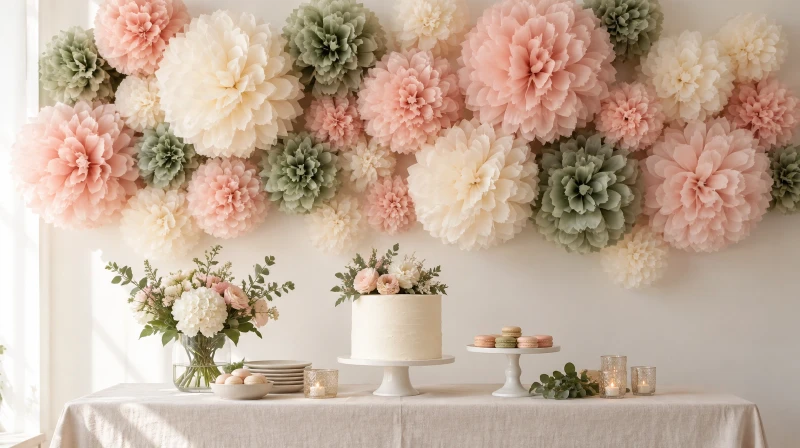
Tissue paper pom poms are a classic, budget-friendly party decoration you can make in minutes, adding soft texture and massive colorful volume to any venue. When hung in an intentional, dense cluster, they create a stunning photo backdrop, an airy ceiling canopy, or a festive dessert table focal point for just a few dollars. These tissue paper pom pom ideas cover the complete making method, starting sheet dimensions, color palettes, hanging methods for different surfaces, and troubleshooting tips.
At DecorWillow, our top styling secret is to craft a mix of three distinct sizes and cluster them closely together. A dense arrangement of varied diameters reads as full, dimensional, and professionally styled, whereas a few identical pom poms spaced far apart tend to look sparse.
- Best for: birthday parties, baby showers, bridal showers, budget celebrations
- Key styling rule: mix 3 sizes, group in dense clusters
- Placement: photo backdrops, ceiling clouds, doorway arches
- Decor budget: about $12 for a complete 10-to-15 pom pom cluster
- Prep time: 3 to 5 minutes each, ideal for making ahead
Table of Contents
- Why tissue pom poms work
- What you need & essential supplies
- How to make a tissue paper pom pom (Step-by-step)
- Pom pom sizes, sheet dimensions, and batch timing
- Color palettes and styling approaches
- Backdrop and focal wall ideas
- Ceiling installations and hanging methods
- Before and after
- Surface-specific hanging and damage-free wall safety
- Exact supplies and quantities you need
- Budget breakdown
- Worth it vs skip
- Small space party styling
- Make-ahead prep, transport, and flat storage
- Common mistakes and troubleshooting
- Pom pom party checklist
- FAQ
- Related articles
Why tissue pom poms work
Tissue paper pom poms deliver dramatic visual impact on a minimal budget. Crafted from folded sheets of lightweight tissue paper, each bloom expands into an airy sphere that softens architectural lines and fills empty vertical space.
Unlike balloons, which require helium or air pumps and deflate within days, tissue pom poms can be folded weeks in advance, transported completely flat, and fluffed on-site. When clustered, their delicate, ruffled texture photographs beautifully and suits every aesthetic from modern pastel nursery showers to vibrant fiesta celebrations.
What you need & essential supplies
You only need a handful of inexpensive crafting staples to create full, professional blooms:
- Tissue Paper Sheets: Standard tissue paper in your chosen color palette (ensure sheets are smooth and uncreased).
- Floral Wire or Sturdy Twine: 24-gauge green or white floral wire is easiest to twist, but cotton baker’s twine or chenille pipe cleaners also work well.
- Sharp Craft Scissors: Sturdy scissors capable of cleanly cutting through 8 to 10 layers of tissue at once.
- Monofilament Fishing Line or Sheer Ribbon: 8 lb to 12 lb clear fishing line creates the illusion of floating pom poms; satin ribbon adds a decorative bow.
- Removable Wall Hooks or Ceiling Clips: Use damage-free clips to protect paint and drywall. For similar installation tips, review our guide on how to hang a balloon garland.
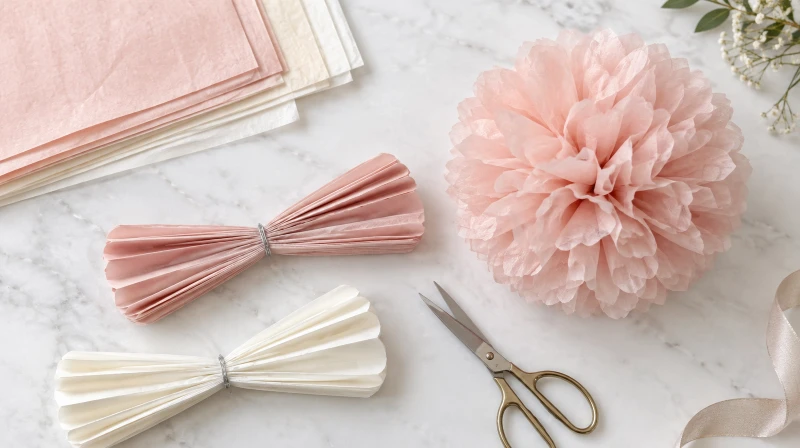 Tissue paper, wire, and scissors are all you need to make full, colorful pom poms in minutes.
How to make a tissue paper pom pom (Step-by-step)
Follow this classic five-step method to craft perfectly balanced spheres every time:
- Stack Your Sheets: Lay 8 to 10 sheets of tissue paper neatly on top of one another on a clean, flat table. Align all four edges as closely as possible.
- Make Accordion Folds: Starting from the shorter edge, fold the entire stack back and forth like an accordion or paper fan. Keep each fold approximately 1 inch to 1.5 inches wide, pressing firmly down on each crease with your fingers.
- Secure the Center: Wrap a 6-inch piece of floral wire tightly around the exact midpoint of your folded strip. Twist the wire ends securely on the back side, leaving a small loop if you plan to thread fishing line for hanging.
- Shape the Petal Tips: Trim both outer ends of the folded strip with sharp scissors. Cut rounded half-circles for soft, peony-like petals, or cut sharp triangular points for a spiky, modern dahlia look.
- Gently Fluff Each Layer: Fan out both sides of the accordion strip. Carefully separate the topmost tissue layer, lifting it gently toward the center wire. Work layer by layer, alternating from left to right and top to bottom, until you have formed a fluffy, voluminous hemisphere on both sides.
Pom pom sizes, sheet dimensions, and batch timing
The secret to a lush arrangement is varying the scale. Use these tested sheet cuts and fold dimensions:
| Pom Pom Size | Starting Tissue Dimensions | Number of Sheets | Fold Width | Finished Diameter | Assembly Time |
|---|---|---|---|---|---|
| Large Statement | 20” x 30” (Full standard sheet) | 8 to 10 sheets | 1.5 inches | 14 to 16 inches | ~4 to 5 minutes |
| Medium Accent | 15” x 20” (Half standard sheet) | 8 sheets | 1.0 inch | 9 to 10 inches | ~3 to 4 minutes |
| Small / Mini | 10” x 15” (Quarter standard sheet) | 6 to 8 sheets | 0.75 inches | 5 to 6 inches | ~2 to 3 minutes |
Realistic Batch Timing
- Single Pom Pom: 3 to 5 minutes (folding + fluffing).
- Small Cluster (8 Pom Poms): 30 to 35 minutes.
- Full Party Backdrop (15 to 20 Pom Poms): 60 to 75 minutes.
- Pro Time-Saver: Work assembly-line style. Fold, wire, and shape all 15 pom poms while watching a show, then store them flat. Fluff them open on party morning.
Color palettes and styling approaches
Stick to a curated color scheme of two to four harmonious shades to maintain a cohesive, intentional feel:
- Soft Monochromatic Ombre: Blend white, blush, soft rose, and mauve for an elegant bridal shower or baby celebration.
- Earthy Organic: Pair sage green, warm ivory, dusty eucalyptus, and a pop of mustard yellow for woodland or botanical parties.
- High-Contrast Fiesta: Combine bright magenta, sunshine yellow, teal, and tangerine for an energetic summer gathering.
- Modern Metallic Accent: Mix matte cream and peach with one or two metallic gold tissue pom poms for added visual depth.
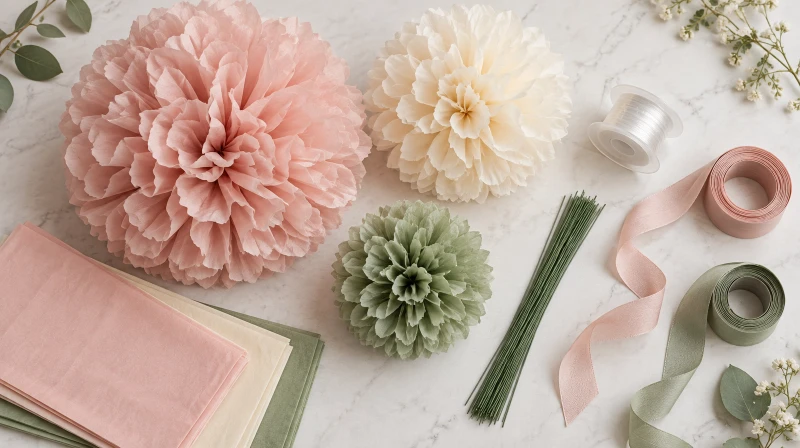 Stick to two or three complementary hues or an ombre progression for a polished, cohesive display.
Backdrop and focal wall ideas
Pom poms provide an organic, textured wall display behind dessert stations or photo areas:
- Organic Cluster Arrangement: Mount 10 to 14 mixed-size pom poms in an asymmetrical crescent or cascading diagonal cluster on a focal wall.
- Dessert Table Canopy: Layer 3 large pom poms centered above your cake, flanked by 5 medium and 4 small pom poms to frame the dessert presentation.
- Layered with Balloons: Blend pom poms into a balloon garland to add matte texture and break up glossy latex sheen. See how to make a balloon garland.
- Doorway Archway: Frame the entryway to your celebration by hanging cascading pom poms from both top corners. For more backdrop ideas, browse our party backdrop ideas.
Ceiling installations and hanging methods
Suspending pom poms overhead transforms the vertical dimension of your room, making tall ceilings feel cozy and dramatic:
- Floating Cloud Canopy: Hang 12 to 18 white, ivory, and cream pom poms at staggered heights over a dining table using clear monofilament line to resemble drifting clouds.
- Staggered Height Drop: Cut fishing lines in lengths varying from 12 inches to 36 inches. Staggering the drop prevents pom poms from colliding into one flat plane and creates dimensional depth.
- Lantern & Pom Pom Mix: Intertwine tissue pom poms with round paper lanterns and honeycomb balls for varied geometric shapes across the ceiling.
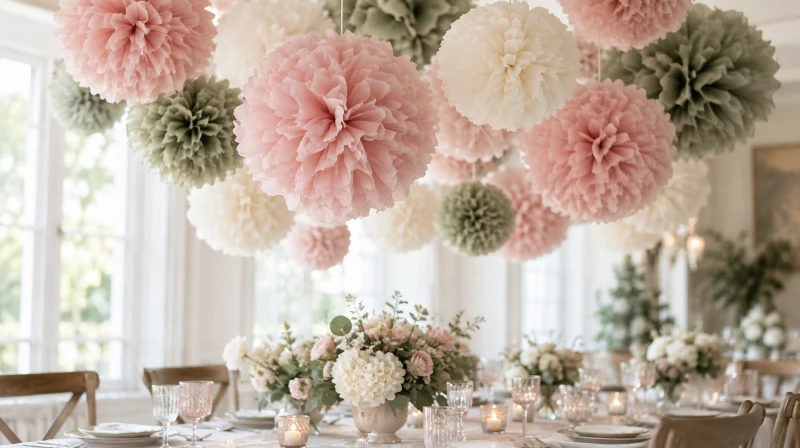 Hanging pom poms in a tight cluster of mixed sizes fills vertical space and creates a festive atmosphere.
Before and after
An empty painted drywall corner can feel plain and uninviting. Adding a clustered bouquet of mixed-size pom poms instantly gives the space warmth, dimension, and celebratory charm.
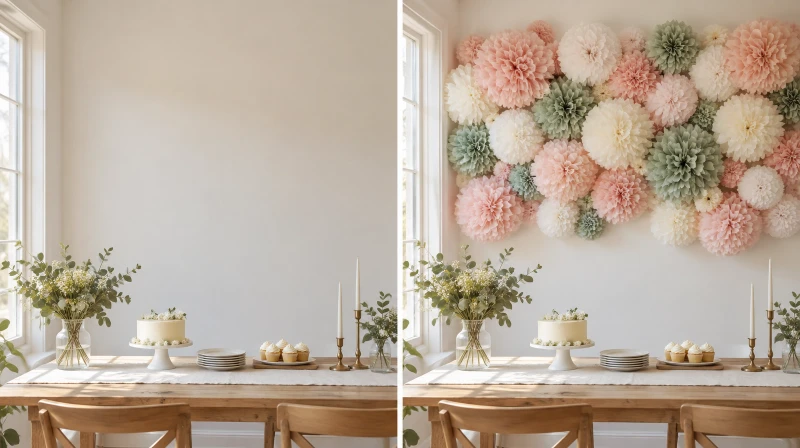 The same wall, transformed with a full, colorful cluster of tissue paper pom poms.
Surface-specific hanging and damage-free wall safety
Because tissue pom poms weigh less than an ounce each, they are easy to secure without damaging rental walls or painted finishes:
- Painted Drywall: Use clear damage-free adhesive hooks or lightweight decorating clips. Clean the spot with rubbing alcohol first, press firmly for 30 seconds, and allow the adhesive to bond before hanging.
- Popcorn or Textured Ceilings: Adhesive strips fail on textured plaster. Instead, use magnetic hooks if metal joist corners exist, or anchor fishing line to ceiling fan mounts, window curtain rods, or removable ceiling clips attached to crown molding.
- Drop / Acoustic Grid Ceilings: For office or hall party spaces, use plastic or metal T-bar grid clips that slide directly onto ceiling tracks without adhesive.
- Fire & Heat Safety: Paper decorations are flammable. Always position pom poms at least 3 feet away from open candle flames, incandescent light bulbs, space heaters, or heated chafing dishes.
Exact supplies and quantities you need
To construct a balanced photo backdrop or ceiling cluster:
- Tissue Paper: 2 packs (approx. 20 to 30 sheets total per color) to yield 10 to 15 mixed-size pom poms.
- Floral Wire / Twine: 1 spool of 24-gauge wire or a 10-foot length of thin cotton twine.
- Fishing Line: 1 spool of clear 8-12 lb monofilament line (approx. 20 yards).
- Removable Hooks: 4 to 6 clear wall clips or mini ceiling hooks.
Budget breakdown
Crafting your own pom poms by hand is one of the most cost-effective party decorations available:
| Supply Item | Quantity & Details | Approx. Cost |
|---|---|---|
| Tissue paper packs | 2 packs of 20 sheets in themed colors | $7 |
| Floral wire spool | 24-gauge green or white craft wire | $2 |
| Clear fishing line | 8 lb monofilament spool | $3 |
| Removable adhesive hooks | 6-pack clear mini clips | $4 |
Total investment: approximately $12 to $16. Pre-fluffed pom poms from party stores often cost $4 to $6 apiece; making them yourself yields 12 to 15 blooms for the cost of two store-bought ones.
Worth it vs skip
- Worth It: Making 8 to 15 pom poms in three distinct sizes (large 14”, medium 9”, small 5”) and bunching them tightly. The density gives the display a high-end, customized look.
- Skip: Hanging 3 or 4 isolated small pom poms in scattered room corners. When separated, individual pom poms look thin and accidental rather than intentional.
Small space party styling
In studio apartments, dorms, or compact dining rooms, large displays can feel overwhelming:
- Style a Single High-Impact Zone: Dedicate one small wall area (like directly over the bar cart or dessert sideboard) for a compact 7-pom-pom cluster.
- Draw the Eye Upward: Suspend 3 varying-length pom poms above the center of a 4-person table to create an intimate party atmosphere without taking up table space. For more tight-space styling tips, read our small-space party decorating ideas.
Make-ahead prep, transport, and flat storage
One of the greatest benefits of tissue pom poms is their compact storage:
- Prep Weeks Ahead: Fold, wire, and trim the petal edges up to a month in advance.
- Store Flat: Keep the folded accordions stored completely flat in a cardboard folder, shoebox, or large envelope. They take up almost zero storage space.
- Transport Flat: Never transport fluffed pom poms in car trunks or backseat bags—they will crush. Transport them flat and fluff them on-site 30 to 45 minutes before party kickoff.
- Post-Party Storage: After the event, you can gently compress pom poms into clean plastic storage totes to reuse for future birthday parties or baby showers.
Common mistakes and troubleshooting
- Issue: Paper tears while pulling layers.
Fix: Grasp each sheet from deep inside the center fold near the wire rather than pulling from the delicate cut edge. Pull slowly upward and outward. - Issue: The pom pom looks uneven or lopsided.
Fix: Your wire was tied off-center. Fold your accordion in half before wiring to find the exact midpoint, and tie firmly without crushing the center creases. - Issue: The center wire slips off.
Fix: Twist floral wire at least 3 to 4 full revolutions on the back side. Avoid loose knots that slide down the folded accordion. - Issue: The cluster looks flat on the wall.
Fix: For wall-mounted backdrops, fluff only one side of the pom pom completely round, leaving the back side slightly flatter so it sits flush against the drywall.
Pom pom party checklist
- Select 2 to 4 complementary tissue paper colors
- Cut sheets to size (large 20”x30”, medium 15”x20”, small 10”x15”)
- Fold stacks into 1” to 1.5” accordions
- Wire centers tightly at the exact midpoint
- Trim petal tips (rounded for peonies, pointed for dahlias)
- Prep 8 to 15 pom poms in mixed sizes
- Clear wall surfaces with alcohol and install adhesive hooks
- Attach clear fishing line at staggered lengths
- Fluff layers carefully from center outward
- Cluster blooms tightly for maximum volume
FAQ
How do I make a tissue paper pom pom?
Stack 8 to 10 sheets of tissue paper, fold the stack into an accordion with 1-inch to 1.5-inch folds, wire the center tightly with floral wire, trim the ends into rounded or pointed petal shapes, and gently pull each layer up and apart to fluff into a full sphere.
What size tissue paper should I use for pom poms?
Use full 20” x 30” sheets for large 14-to-16 inch pom poms, half sheets (15” x 20”) for medium 9-to-10 inch pom poms, and quarter sheets (10” x 15”) for small 5-to-6 inch accent blooms.
How many tissue paper pom poms do I need for a party?
For an eye-catching photo backdrop or ceiling cluster, plan on 8 to 15 pom poms in mixed sizes. A dense cluster of large, medium, and small pom poms looks lush and styled, whereas fewer than 6 pom poms spread out can appear sparse.
How long does it take to make tissue pom poms?
A single pom pom takes 3 to 5 minutes to fold and fluff. A full cluster of 8 pom poms takes approximately 30 minutes, while a large backdrop cluster of 15 blooms takes about one hour.
How do I hang tissue paper pom poms from walls and ceilings?
Tie clear monofilament fishing line to the center wire loop and hang from clear removable wall hooks or ceiling clips. For ceilings, hang at varied heights between 12 and 36 inches to create depth. For walls, mount the largest pom poms first and tuck medium and small pom poms tightly around them.
How do I prevent tissue paper from tearing while fluffing?
Pull each tissue layer individually from deep near the center wire rather than pulling from the delicate trimmed edges. Pull upward and outward with a gentle, steady motion.
How much do tissue paper pom poms cost?
A complete DIY cluster of 10 to 15 pom poms costs about $12 to $16 for tissue paper, wire, fishing line, and wall hooks. Because you can fold them flat and reuse them, the cost per party is extremely low.
Can I make tissue pom poms ahead of time?
Yes. Fold, wire, and trim your pom poms weeks in advance and store them completely flat in a box or folder. On party day, simply fluff out the layers on-site to keep them fresh and crush-free.
Related articles
- DIY Tassel Garland Tutorial
- Streamer Decoration Ideas
- Cheap Party Decoration Ideas
- Party Backdrop Ideas
📌 Pin this for later!