Photo Booth Props Ideas (DIY Props, Sizes & Budget)
Part of our guide: Party Backdrop and Decor Ideas: The Complete Guide
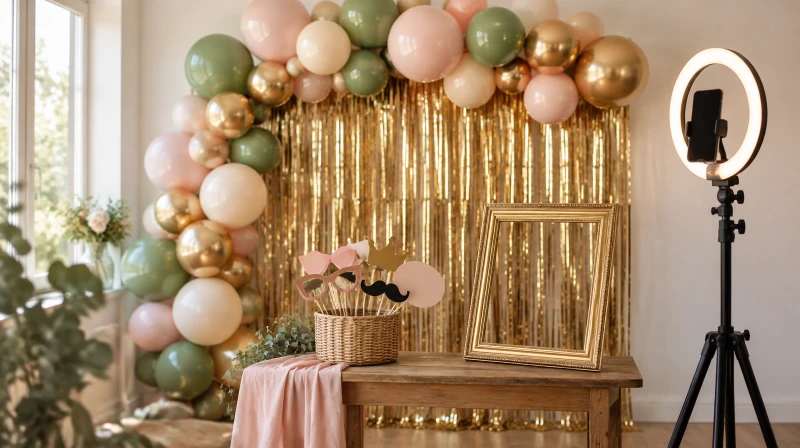
Photo booth props are cheap, and guests love them. The props are what make a plain wall into a photo spot. These photo booth props ideas give you prop lists for birthdays, baby showers, and holidays, DIY templates with exact sizes, how many props you need for your guest count, a simple setup, and a budget.
At DecorWillow, our top tip is to make fewer props but sturdier ones. Twelve strong props on thick sticks beat thirty floppy ones that tear in the first ten minutes.
- Best for: birthdays, baby showers, holidays, and adult parties with 10 to 25 guests
- Props needed: about 1 per guest, at least 12, plus 25 percent extra (25 props for 20 guests)
- Booth area: about 6 feet wide by 8 feet deep
- Budget: about $56 DIY version, about $160 full version for 20 guests
- Setup time: about 30 minutes on the day, plus about 2 hours the day before to make 25 props
Top Decor Picks for this Setup
Curated essentials on Amazon with top customer reviews to help you recreate this setup easily.
Blush, Sage & Gold Balloon Garland Kit
The balloon backdrop behind the photo booth.
Gold Foil Fringe Curtain Backdrop
The shimmering wall behind the props.
10 inch Ring Light with Tripod Stand
Even light for photos at night.
Photo Booth Props Kit with Sticks
Ready-made props to mix with your DIY ones.
Table of Contents
- Pick your prop style
- Prop ideas by party type
- DIY prop templates and sizes
- How many props you need
- Set up the photo booth area
- Lighting and camera tips
- Before and after
- A photo guest book
- Photo challenge cards
- Safety tips
- Helpful safety sources
- Exact quantities you need
- Budget breakdown
- Worth it vs skip
- Small space version
- Setup timeline
- Party checklist
- FAQ
- Related articles
Pick your prop style
| Style | What it is | Best for |
|---|---|---|
| Paper props on sticks | Glasses, mustaches, signs, and speech bubbles on a stick | Kids parties and baby showers |
| Wearables | Hats, crowns, headbands, feather boas, and sunglasses | Adult parties and birthdays |
| Signs and frames | Chalkboard or foam board signs, and a big empty frame | Any party, and good for photo guest books |
Use a mix. Many guests grab a wearable first, then a sign.
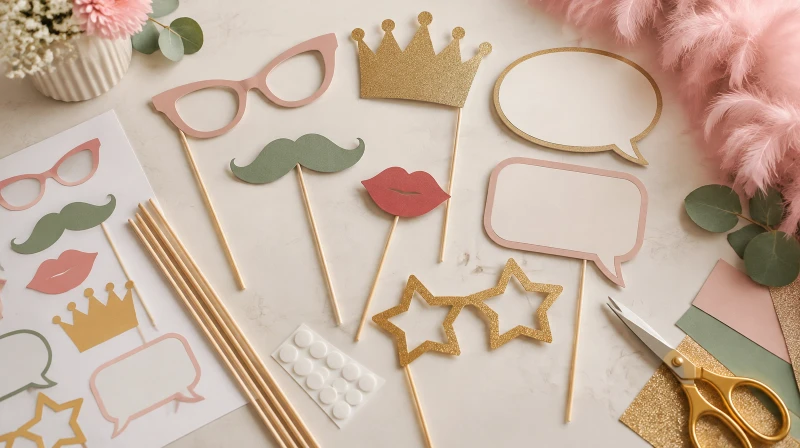 A mix of glasses, a crown, speech bubbles, and wearables covers most guests.
Prop ideas by party type
- Kids birthday: a paper crown, a party hat, a cake-slice cutout, a balloon-shaped sign, and a “birthday boy or girl” sign with the age.
- Baby shower: a pacifier on a stick, a baby bottle, “Oh Baby” and “Team Pink or Blue” signs, and “Mama” and “Dada” glasses.
- Adult birthday: big sunglasses, a feather boa, a “Cheers” sign, and a number or letter balloon.
- Christmas or winter: a Santa hat, reindeer antlers on a headband, a snowflake on a stick, and a mistletoe sign.
- Any party: speech bubbles with phrases like “Best day ever,” a mustache, lips, a crown, and a blank frame.
For baby shower ideas see our baby shower games, and for favors see our kids party favor ideas.
DIY prop templates and sizes
Use these sizes so the props look right in a photo:
| Prop | Size | Material |
|---|---|---|
| Glasses | 6 inches wide, 2.5 inches tall | Cardstock, 110 lb |
| Mustache | 5 inches wide | Cardstock or felt |
| Lips | 4 inches wide | Cardstock |
| Crown | 10 inches tall | Foam board or cardstock, doubled |
| Speech bubble | 8 by 5 inches | Cardstock, doubled |
| Sign | 8 by 10 inches | Foam board |
| Stick | 12 inches, 3/16 inch thick | Wood dowel |
Draw your own templates. Sketch each shape on a piece of cardboard with the sizes above, cut it out, and use it as a pattern:
- Glasses: two circles about 2.5 inches across, joined by a 1 inch bridge, 6 inches wide in total.
- Mustache: a curved shape 5 inches wide with a small dip in the middle.
- Lips: a heart shape 4 inches wide with the top split in two bumps.
- Crown: a strip 10 inches tall with 5 points, long enough to wrap around a head (about 22 inches), or glued to a headband.
- Speech bubble: an oval 8 by 5 inches with a small tail at the bottom.
Wearables: glue the crown or the antlers to a plain headband, or cut a strip of foam board to fit a head and staple the ends.
How to make a sturdy paper prop:
- Trace the template onto 110 lb cardstock, and cut two of each prop.
- Glue the two pieces together with the stick between them, so the stick is in the middle.
- Overlap the stick with the prop by about 3 inches, so it does not wobble.
- Press under a book for 10 minutes so the glue is flat.
- Sand both ends of the stick round and smooth. Hold the prop by the stick and wave it. If it wobbles, glue a third layer of cardstock around the top of the stick.
A batch of 25 props takes about 2 hours, with a template.
How many props you need
Use this formula: guests x 1, with a minimum of 12, plus 25 percent extra. Guests will put props down and not use them all at once.
| Guests | Props to make |
|---|---|
| 10 | 12 to 15 |
| 20 | 25 |
| 30 | 35 to 38 |
Put out an equal mix: about half wearables and half sticks and signs.
Set up the photo booth area
- Space: a clear area about 6 feet wide and 8 feet deep, with the backdrop on one wall and the camera at the other end. For a backdrop, see our DIY photo booth backdrop and our party backdrop ideas.
- Props on a table: put a small table or a basket at one side. Use a box or a bin with a lid so the props stay clean and flat.
- Sign: add a small sign that says “Props are here, take a photo,” so guests know what to do.
- Floor: tape an “X” on the floor, about 3 feet from the backdrop, so people stand in the right spot.
- Wipes: keep a pack of wipes or a small bottle of sanitizer for shared hats and glasses.
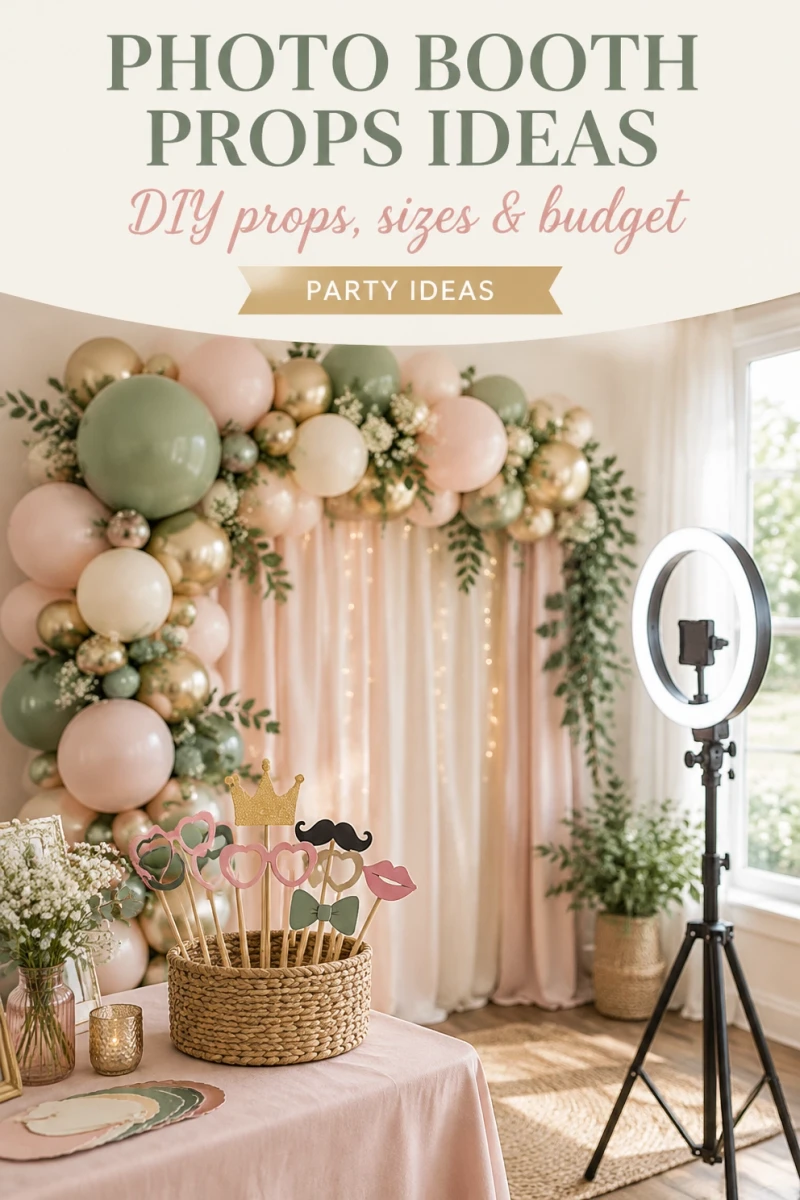
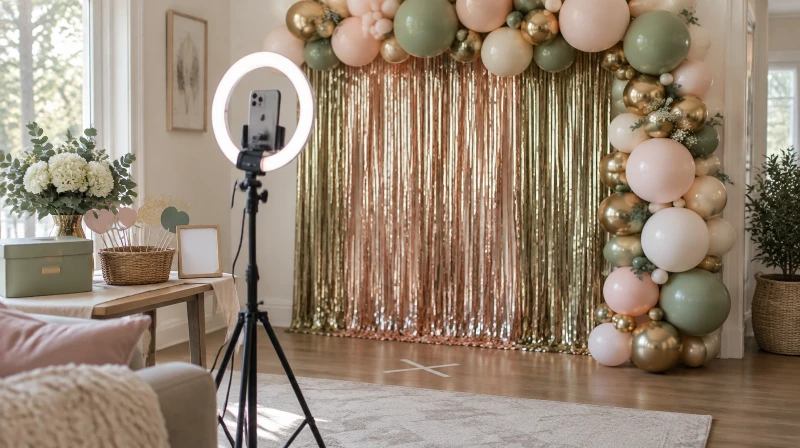 A backdrop, a prop table, a floor mark, and a phone on a tripod is the whole booth.
Lighting and camera tips
- Face the light: stand the guests facing a window or a soft lamp, not with the light behind them.
- Ring light: a 10 to 12 inch ring light on a tripod gives even light at night.
- Height: place the phone or camera at chest height, about 4 to 5 feet, for a group of adults. Lower it to 3 feet for kids.
- Distance: 5 to 6 feet away fits 3 to 4 people in the photo.
- Timer: use the 10 second timer, so a guest can start it, and take 3 shots in a row.
- Camera roll: make a shared album before the party so guests can add their photos.
For lights see our fairy light ideas.
Before and after
You only need one wall. Here is the same wall before and after. The changes are a backdrop, a prop table, a floor marker, and a tripod with a ring light. It takes about 30 minutes.
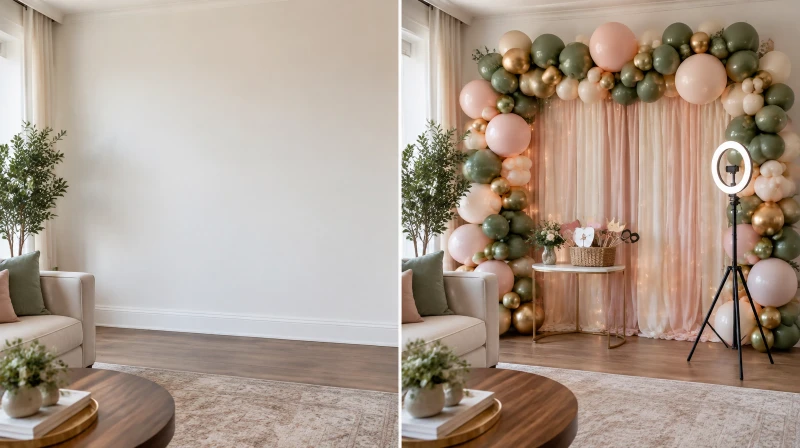 A plain wall turns into a photo booth with four changes.
A photo guest book
A photo guest book is a use for the photos that costs very little.
- Use an instant camera or a small printer, and a large blank album or a poster board.
- Each guest takes one photo, glues or tapes it in, and writes a note next to it.
- Plan 1 instant film shot per guest plus 5 extra, so for 20 guests buy a pack of 20 and one more pack of 10.
- Put out a pen, glue dots, and a few stickers.
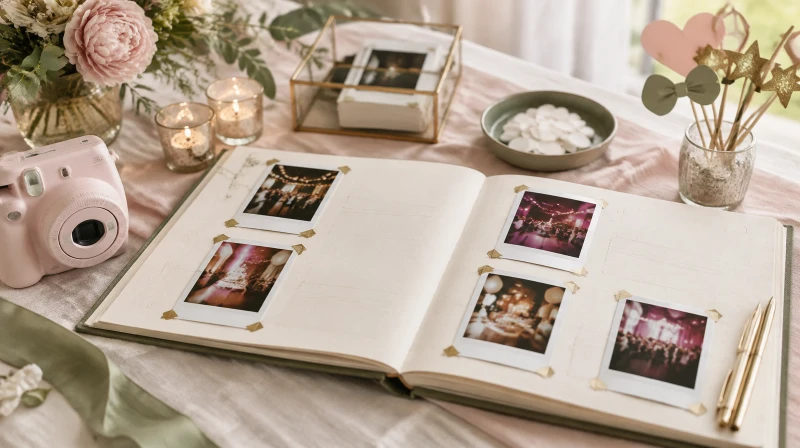 Guests glue in a photo and write a note, and the parents get a keepsake.
Photo challenge cards
Put 8 cards in a bowl, and each group picks one. Examples:
- The silliest face
- The fanciest photo
- A photo in a pose from a movie
- A group photo with everyone holding a prop
- A photo with the guest of honor
- A photo that has the most props in it
Plan 8 cards and 10 minutes during the party.
Safety tips
- Sticks: use thick dowels with a rounded or sanded end, and do not use pointed skewers. For kids under 4, skip stick props and use wearables or a paddle-style prop with a wide handle.
- Small parts: avoid glued-on beads, buttons, and glitter on props for young children, because small parts can come off. See the safety sources below.
- Fabric and feathers: keep boas and feather items away from candles.
- Balloons: if a backdrop has balloons, keep broken pieces away from children under 8.
- Hygiene: wipe shared hats and glasses with a wipe between guests, or offer sticks only at a food-heavy party.
Helpful safety sources
A trusted place for the safety points in this guide:
- HealthyChildren (AAP): choking prevention: Why small parts and broken balloon pieces are a choking risk for young children.
Exact quantities you need
For 20 guests:
- Props: 25 (about 12 wearables and 13 sticks or signs).
- Cardstock, 110 lb: 50 sheets (2 per prop, plus extras).
- Wooden dowels, 12 inches long: 1 pack of 30 (13 for the props, the rest are spares).
- Foam board: 2 sheets (20 by 30 inches), for crowns and signs.
- Glue dots or hot glue sticks: 1 pack.
- Backdrop: 1, about 6 feet wide.
- Props table and basket: 1.
- Phone tripod: 1, and a ring light (optional).
- Instant film: 30 shots for the guest book (20 plus 10 extra).
- Wipes: 1 pack.
- Challenge cards: 8.
Budget breakdown
This assumes 20 guests, 25 props, a window for light, and a backdrop you make yourself. Pick the column that fits you:
| Item | DIY version | Full version |
|---|---|---|
| Cardstock, 110 lb (50 sheets) | $8 | $12 |
| Foam board and glitter sheets | $6 | $10 |
| Dowels or jumbo craft sticks (pack of 30) | $6 | $10 |
| Glue dots or hot glue sticks | $5 | $8 |
| Backdrop (fringe curtain or sheet) | $12 | $25 |
| Bought wearables (hats, glasses, boas) | $10 | $30 |
| Blank signs and speech bubbles | $4 | $12 |
| Ring light and tripod | $0 (use a window and a stack of books) | $25 |
| Instant film (30 shots) for the guest book | $0 (skip) | $18 |
| Prop box and wipes | $5 | $10 |
| Total | $56 | $160 |
These are planning estimates for U.S. stores, exclude tax, and vary by store and region. A phone and a camera are assumed.
Worth it vs skip
- Worth it: a sturdy backdrop and a mix of wearables. They get used the most, and you can use the backdrop again.
- Skip: a lot of glitter props and a printed photo strip service. Guests take their photos on their phones anyway.
Small space version
Use a 3 foot wide section of wall, a fringe curtain or a sheet on the wall, and 12 props. Put the props in a basket on a chair. Use the phone timer, and sit the phone on a stack of books. For a very small room, use a doorway as the backdrop and a tape marker on the floor.
Setup timeline
- 1 week before: Buy cardstock, dowels, and the backdrop, and draw the templates on cardboard.
- 1 day before: Cut and glue the 25 props and let them dry under a book. Takes about 2 hours.
- The day of: Hang the backdrop, put out the prop box and the floor mark, and set up the phone or tripod. Takes about 30 minutes.
- After the party: Wipe the props and store them flat in the box for the next party.
Party checklist
- 25 props (half wearables, half sticks and signs)
- Backdrop and something to hang it with
- Prop table and basket
- Floor marker
- Phone tripod or a stack of books
- Ring light or a window
- Shared photo album link
- Wipes
- Guest book supplies (optional)
- Challenge cards (optional)
FAQ
What are the best photo booth props for a party?
The best props are big sunglasses, a crown, a mustache, lips, speech bubbles, a feather boa, and a blank frame. Use a mix of about half wearables and half sticks and signs. Match a few props to the party, like a pacifier for a baby shower or a Santa hat for Christmas.
How many photo booth props do I need?
Plan about 1 prop per guest with a minimum of 12, plus 25 percent extra. For 20 guests that is 25 props. Guests put props down and do not use them all at once.
How do you make DIY photo booth props?
Trace the template on 110 lb cardstock, cut two of each prop, and glue them together with a 12 inch dowel in the middle. Overlap the stick by about 3 inches and press under a book for 10 minutes. A batch of 25 props takes about 2 hours. Sand the ends of the sticks round and smooth.
How big should photo booth props be?
Glasses should be about 6 inches wide, a mustache 5 inches wide, lips 4 inches wide, a crown 10 inches tall, and a speech bubble 8 by 5 inches. Use a 12 inch stick, 3/16 inch thick, so the prop is easy to hold.
How much does a DIY photo booth cost?
A photo booth with 25 props for 20 guests costs about $56 for a DIY version and about $160 for a full version with a ring light, a tripod, and instant film. Tax is not included.
How much space do I need for a photo booth?
Plan an area about 6 feet wide and 8 feet deep, with the backdrop on one wall and the camera at the other end. Mark a spot on the floor about 3 feet from the backdrop. In a small room, a 3 foot wide wall section also works.
How do I light a photo booth at home?
Have guests face a window or a soft lamp, not stand with the light behind them. At night use a 10 to 12 inch ring light. Put the phone at chest height, about 4 to 5 feet, and use the 10 second timer.
Are photo booth props safe for small children?
Use thick dowels with a sanded, rounded end, and skip stick props for kids under 4. Avoid glued-on beads and buttons, because small parts can come off and are a choking risk. Offer wearables like crowns instead.
Related articles
📌 Pin this for later!
Recreate This Look: Complete Supply Checklist
Every prop, decor item, and material identified in our styled photos, linked directly to top-rated supplies on Amazon.
Inflates the garland balloons quickly.
Holds the balloons together to build the garland.
Fix balloons and paper pieces in place.
The heavy paper for the DIY props.
Sticks for the props.
An easy stick for kids props.
For crowns and signs.
Add sparkle to the glasses and crowns.
Glues the props together.
Smooths the ends of the sticks.
For crowns and antlers.
A wearable prop.
A wearable prop for adults.
For speech bubbles and signs.
A blank frame prop.
Photos for the guest book.
The guest book.
Wipe shared hats and glasses.